I’ve been bumping my head around Github Actions recently, as most of our Continuos Integration (CI) builds time was spent installing third party libraries. In most of our projects we have to deal with large dependencies like Pytorch or CUDA, which are needed to run our test suite and some others like pre-commit that help us to lint our code. This is very annoying since you need to run all setup steps on every build even though your environment does not change.
A classic CI workflow can be split into two different blocks. The first one installs all dependencies that are going to be needed for running all jobs that compone the second block (test, lint, etc.). When these dependencies are small and they can be installed in a few seconds, you do not need to worry about them. Problems come when you deal with larger packages which is usually the case when working with Deep Learning.
In this post I pretend to provide some intuition of how have I optimized some of these pipelines for building Pytorch and Cuda using a Conda environment in a pretty efficient way.
1. The classic approach
A common way to automate tasks such as Python package code formatting is to use pre-commit hooks. Also, I am used to working with pytest because I consider it a very flexible and intuitive framework to run all my tests. So these dependencies and others like Pytorch need to be installed in our environment before we can use them properly. I use Conda environments for Python package management as it is a very powerful tool.
I’ve set up a very simple and straightforward Github repository that follows this approach so that we can easily visualize the different pipelines that we’re going to use. So a simple CI pipeline that uses Anaconda Action for Python package management might look like this:
name: Continuous Integration

on:
  push:
    branches: [main]
  pull_request:
    branches: [main]

jobs:
  build:
    runs-on: ubuntu-latest
    steps:
      - uses: actions/checkout@v2
      - name: Set up Conda environment
        uses: conda-incubator/setup-miniconda@v2
        with:
          activate-environment: my_environment
          environment-file: conda.yml
      - name: Lint code
        run: |
          pre-commit install
          pre-commit run
      - name: Run tests
        run: pytest tests
This workflow needs to configure the conda environment each time it runs, although conda.yaml has not changed. This is far from efficient as we spend time doing the same. There must be a better way to speed this up … and as usual these days, Docker is involved!
2. Adding Docker into the equation
Docker is great and we should take advantage of it. I don’t intend to cover the basics of Docker in this post, so I assume the reader is used to struggling with it. Anyway, if there is anything in this post that is not clear to you, feel free to reach out to me via Twitter.
We can build our Docker image based on Conda in multiple different ways. I just recently discover this amazing blog which actually covers an important topic when building this kind of images: their size. In here you can understand why is necessary to shrink your conda Docker images as much as you can and the different possibilities you can use. For this case we will stick with the classic approach and build a single stage image over miniconda. I have also used some old tricks to clean conda cache and python bytecode files.
FROM continuumio/miniconda3

ENV PYTHONDONTWRITEBYTECODE=true

COPY conda.yml .

RUN conda env create -f conda.yaml && \
    conda clean -afy && \
    find /opt/conda/ -follow -type f -name '*.a' -delete && \
    find /opt/conda/ -follow -type f -name '*.pyc' -delete && \
    find /opt/conda/ -follow -type f -name '*.js.map' -delete

# Add environment to path
ENV PATH /opt/conda/envs/my_environment/bin:$PATH

ENTRYPOINT [ "/bin/bash" ]
We can build the image with all our dependencies installed and push it to some public image registry. In this case I am going to use the new Github container registry. I have created an access token (check this for knowing more about creating personal access tokens) for my account so I can login and push images for this repository. You can do the same on your computer by:
$ export $MY_TOKEN=[INTRODUCE_YOUR_TOKEN_HERE]
$ echo $MY_TOKEN | docker login ghcr.io -u USERNAME --password-stdin
$ docker build -f Dockerfile -t ghcr.io/USERNAME/REPO/IMAGE_NAME:VERSION
$ docker push ghcr.io/USERNAME/REPO/IMAGE_NAME:VERSION
So now we can update our CI workflow to use our Docker images using the container tag. I will keep the old Anaconda based job to easily compare running times of each one. Our pipeline would look like this now:
name: Continuous Integration

on:
  push:
    branches: [main]
  pull_request:
    branches: [main]

jobs:
  build_with_conda_action:
    runs-on: ubuntu-latest
    container:
      image: ghcr.io/mmeendez8/cache_docker/ci:latest
      credentials:
        username: mmeendez8
        password: ${{ secrets.MY_TOKEN }}

    steps:
      - uses: actions/checkout@v2
      - name: Set up Conda environment
        uses: conda-incubator/setup-miniconda@v2
        with:
          activate-environment: my_environment
          environment-file: conda.yml
      - name: Lint code
        run: |
          pre-commit install
          pre-commit run
      - name: Run tests
        run: pytest tests

  build_with_docker:
    runs-on: ubuntu-latest
    container:
      image: ghcr.io/mmeendez8/cache_docker/ci:latest
      credentials:
        username: mmeendez8
        password: ${{ secrets.MY_TOKEN }}

    steps:
      - uses: actions/checkout@v2
      - name: Lint code
        run: |
          pre-commit install
          pre-commit run
      - name: Run tests
        run: pytest tests
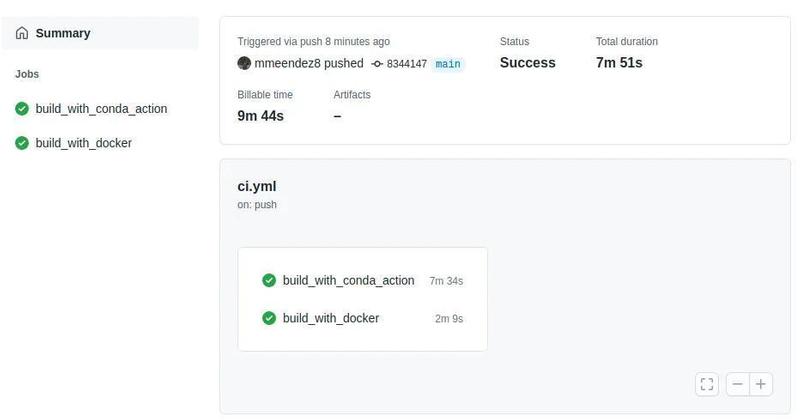
If we check the execution times of these two jobs, we see that the Docker action took less than two minutes, while Conda’s job lasted up to ~ 8 minutes. Well now we know how to use our own image for continuous integrations on Github Actions. But … we need to manually build and load our docker image when we want to add a new dependency to our conda environment or when we want to modify our Dockerfile. This is bad and this was the main motivation that led me to write this article, so let’s see how we can avoid it.
3. Building and pushing Docker images on Github Actions
What we want to do is automate the build and push steps. There are many ways to solve this problem, the simplest would be to add a Docker build and push step to our pipeline so that the image is always compiled with the latest changes and ready to go. However … this would be even worse than going back to where we started. We’d be building our Docker image, pushing it to the Github registry, and then running it for our test and lint steps, and this is clearly slower than installing Conda dependencies every time.
There is (as usually) a better way. I found this wonderful evilmartians post that explains why you should use Docker Layer Caching (DLC). If you are unfamiliar with DLC, I recommend that you stop here now and read that post in its entirety. The DLC will save the image layers created within your jobs, so we can reuse those layers when the docker build step is executed, reducing its duration. In other words, we’re going to take advantage of the Github cache to store Docker layers, so those layers are there ready to use for us next time the action is triggered.
The new pipeline would look a little bit more complicated. It has been adapted from the example on evilmartians post so refer to there in case you have any doubt.
name: Continuous Integration with layer caching

on:
  push:
    branches: [main]
  pull_request:
    branches: [main]

jobs:
  build_docker:
    runs-on: ubuntu-latest
    steps:
      - uses: actions/checkout@v2
      - name: Set up Docker Buildx
        id: buildx
        uses: docker/setup-buildx-action@master
        with:
          install: true
      - name: Cache Docker layers
        uses: actions/cache@v2
        with:
          path: /tmp/.buildx-cache
          key: ${{ runner.os }}-multi-buildx-${{ github.sha }}
          restore-keys: |
            ${{ runner.os }}-multi-buildx
      - name: Login to GitHub Container Registry
        uses: docker/login-action@v1
        with:
          registry: ghcr.io
          username: mmeendez8
          password: ${{ secrets.MY_TOKEN }}
      - name: Build production image
        uses: docker/build-push-action@v2
        with:
          context: .
          builder: ${{ steps.buildx.outputs.name }}
          file: Dockerfile
          push: true
          tags: ghcr.io/mmeendez8/cache_docker/ci_dlc:latest
          cache-from: type=local,src=/tmp/.buildx-cache
          cache-to: type=local,mode=max,dest=/tmp/.buildx-cache-new
      - name: Move cache
        run: |
          rm -rf /tmp/.buildx-cache
          mv /tmp/.buildx-cache-new /tmp/.buildx-cache

  lint_and_test:
    needs: build_docker # Wait for build step to finish
    runs-on: ubuntu-latest
    container:
      image: ghcr.io/mmeendez8/cache_docker/ci_dlc:latest
      credentials:
        username: mmeendez8
        password: ${{ secrets.MY_TOKEN }}

    steps:
      - uses: actions/checkout@v2
      - name: Lint code
        run: |
          pre-commit install
          pre-commit run
      - name: Run tests
        run: pytest tests
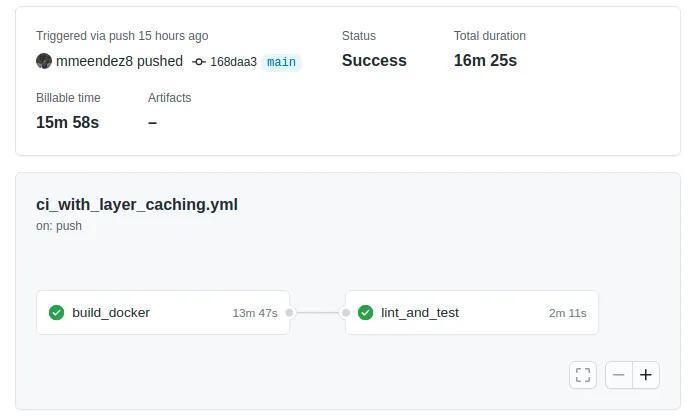
The first time we run this job, our cache is empty, so it will create the docker image from scratch, and that takes about 15 minutes!
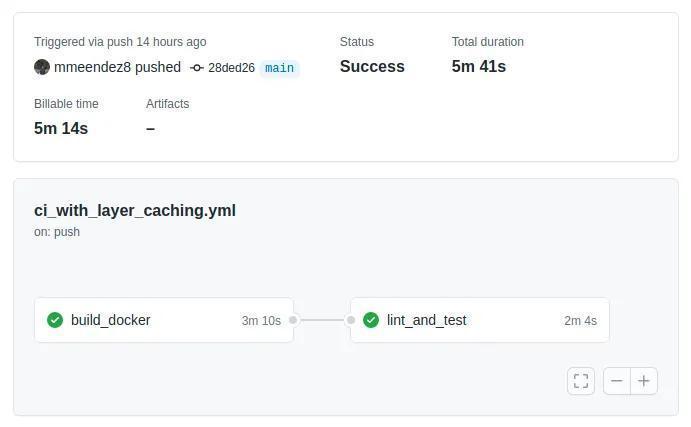
But the next time the action fires (and if we don’t modify our Dockerfile or Conda environment) we can reuse the cached layers and reduce this time to just ~ 6 minutes.
So now we’ve incorporated the Docker build step into our pipeline, so we don’t need to manually upload a new image every time our dependencies change. In addition, we have been able to optimize this build by taking advantage of the Docker layers and the Github cache, reducing the compilation time to a third of the initial duration. But there is still room for improvement!
5. Cache them all!
As we have seen before, our Docker image is built whether our Dockerfile or Conda environment file is modified. So what if we just skip the build step when this has not occurred? We can do this in a very simple manner using taking advantage once again from Github Actions! We can track both files, calculating a hash from their content, so the build step only triggers when this hash changes. We just need to add a few lines to our pipeline.
name: Continuous Integration full caching

on:
  push:
    branches: [main]
  pull_request:
    branches: [main]

jobs:
  build_docker:
    runs-on: ubuntu-latest

    steps:
      - uses: actions/checkout@v2
      - name: Check Cached environment
        uses: actions/cache@v2
        id: cache
        env:
          # Increase this value to force docker build
          CACHE_NUMBER: 0
        with:
          path: env.yml
          key: ${{ runner.os }}-conda-${{ env.CACHE_NUMBER }}
            -${{hashFiles('Dockerfile')}}-${{hashFiles('conda.yaml')}}

      - name: Set up Docker Buildx
        id: buildx
        if: steps.cache.outputs.cache-hit != 'true' # Condition to skip step when cache hit
        uses: docker/setup-buildx-action@master
        with:
          install: true

      - name: Cache Docker layers
        if: steps.cache.outputs.cache-hit != 'true'
        uses: actions/cache@v2
        with:
          path: /tmp/.buildx-cache
          key: ${{ runner.os }}-multi-buildx-${{ github.sha }}
          restore-keys: |
            ${{ runner.os }}-multi-buildx
      - name: Login to GitHub Container Registry
        if: steps.cache.outputs.cache-hit != 'true'
        uses: docker/login-action@v1
        with:
          registry: ghcr.io
          username: mmeendez8
          password: ${{ secrets.MY_TOKEN }}

      - name: Build production image
        if: steps.cache.outputs.cache-hit != 'true'
        uses: docker/build-push-action@v2
        with:
          context: .
          builder: ${{ steps.buildx.outputs.name }}
          file: Dockerfile
          push: true
          tags: ghcr.io/mmeendez8/cache_docker/ci_dlc:latest
          cache-from: type=local,src=/tmp/.buildx-cache
          cache-to: type=local,mode=max,dest=/tmp/.buildx-cache-new

      - name: Move cache
        if: steps.cache.outputs.cache-hit != 'true'
        run: |
          rm -rf /tmp/.buildx-cache
          mv /tmp/.buildx-cache-new /tmp/.buildx-cache

  lint_and_test:
    needs: build_docker
    runs-on: ubuntu-latest
    container:
      image: ghcr.io/mmeendez8/cache_docker/ci_dlc:latest
      credentials:
        username: mmeendez8
        password: ${{ secrets.MY_TOKEN }}

    steps:
      - uses: actions/checkout@v2
      - name: Lint code
        run: |
          pre-commit install
          pre-commit run
      - name: Run tests
        run: pytest tests
Note how I have also added some if conditionals if: steps.cache.outputs.cache-hit != 'true' to those steps that come after the cache step to skip them when necessary. I have also added a CACHE_NUMBER variable that we can modify when we need to force the docker build.
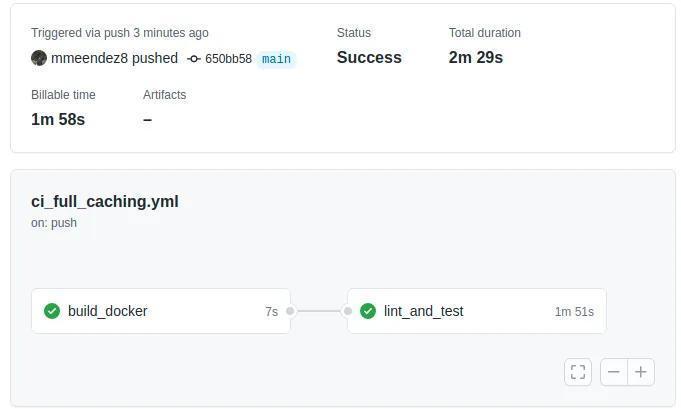
We can now push our changes and Github will compute that hash and save it in the cache.. If we later commit some changes to our repository, like adding a new test function or some new feature to our source code, the compile time will look like this:
That’s only 2 minutes and 29 seconds! We have fully automated our pipeline minimizing the time we need to install all our dependencies!
Conclusion
We’ve learned how to improve our CI pipelines by leveraging the power of Github, Docker, and Conda Actions cache. We started by covering some of the usual problems we face when designing this pipelines and finally implemented an optimized version of the example pipeline.
-
We have learned how to use Github Actions with the official Anaconda Action
-
We have also learn how to push Docker images to the Github Registry and how to fully automatize this inside Actions.
-
The use of Docker Layer Caching allows us to reduce building time and we have seen how to setup this in our pipeline.
-
Finally, the use of an extra caching combined with the power of conditional syntax allowed us to skip the build step when possible.
Any ideas for future posts or is there something you would like to comment? Please feel free to reach out via Twitter or Github


